[Flutter] BottomNavigationBar이용해서 앱 내비게이션 구현하기

앱 개발에 있어서 중요한 부분 중 하나는 사용자가 앱 내에서 원하는 화면으로 쉽게 이동할 수 있는 내비게이션 구현입니다. Flutter에서는 BottomNavigationBar 위젯을 활용하여 손쉽게 하단 탭 내비게이션을 구현할 수 있습니다.
이번 포스팅에서는 Flutter 앱을 개발하면서 하단 탭 내비게이션을 구현하는 방법을 예제 코드와 함께 알아보겠습니다.
먼저, Flutter 프로젝트를 생성하고 material 패키지를 임포트합니다.
import 'package:flutter/material.dart';그리고 main.dart 파일에 주어진 코드를 추가합니다. 코드를 살펴보면 MyApp 클래스가 StatefulWidget을 상속하고 있으며, BottomNavigationBar와 함께 사용될 화면 위젯들을 저장하는 _screens 리스트가 선언되어 있습니다.
class MyApp extends StatefulWidget {
  @override
  _MyApp createState() => _MyApp();
}
  class _MyApp extends State<MyApp> {

  int _currentIndex = 0; //탭 이동시 증가

  final List<Widget> _screens = [
    HomeScreen(),
    SettingScreen(),
  ];
build 메서드에서는 MaterialApp과 Scaffold를 이용하여 앱의 기본 구조를 설정하고, bottomNavigationBar에 BottomNavigationBar 위젯을 추가하고 있습니다.
BottomNavigationBar의 items 속성에는 화면에 표시될 하단 탭 메뉴 아이템들이 정의되어 있습니다.
각 아이템은 BottomNavigationBarItem 위젯으로 구성되며, icon과 label 속성을 이용하여 아이콘과 라벨을 설정할 수 있습니다. 이 예제에서는 "홈"과 "설정" 두 개의 탭 메뉴가 정의되어 있습니다.
items: const [
	// 하단 탭 메뉴 아이템 1
	BottomNavigationBarItem(
  		icon: Icon(Icons.home),
  		label: '홈',
	),
	// 하단 탭 메뉴 아이템 2
	BottomNavigationBarItem(
  		icon: Icon(Icons.settings),
	  	label: '설정',
	),
],
또한, onTap 콜백 함수에서는 탭 메뉴를 클릭했을 때 현재 선택된 인덱스를 업데이트하고, 화면을 갱신하기 위해 setState 메서드를 호출하고 있습니다. 이렇게 하면 탭 메뉴를 클릭할 때마다 _currentIndex 값이 변경되어 선택된 화면이 갱신됩니다.
currentIndex: _currentIndex,
onTap: (index) {
  setState(() {
  	_currentIndex = index;
  }),
},
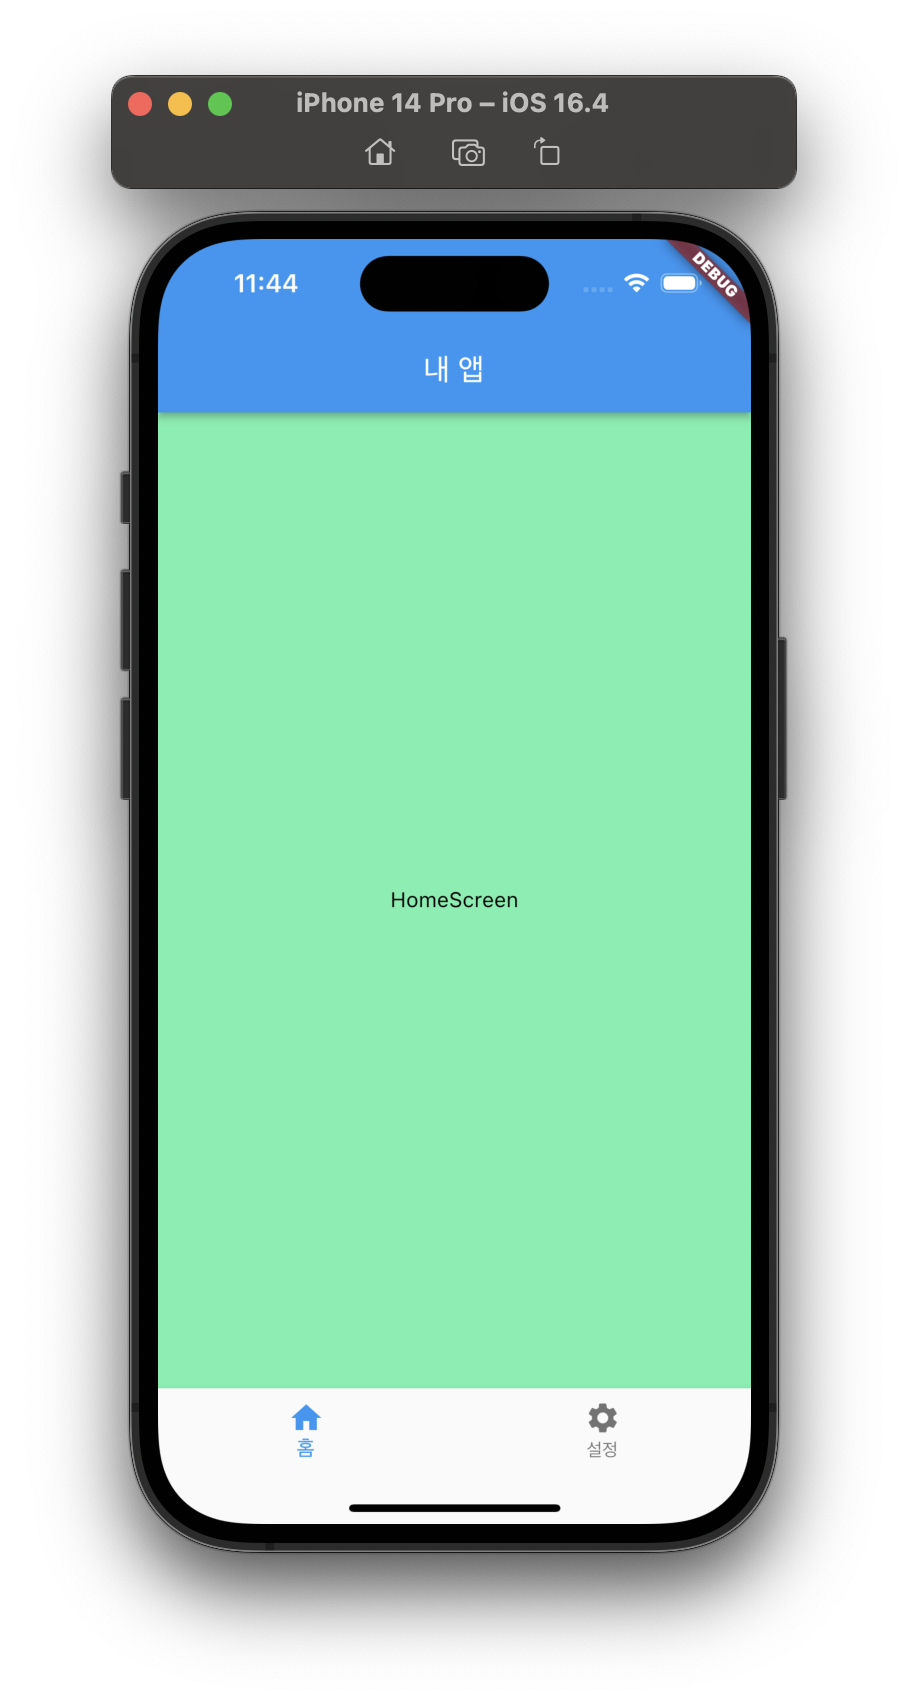
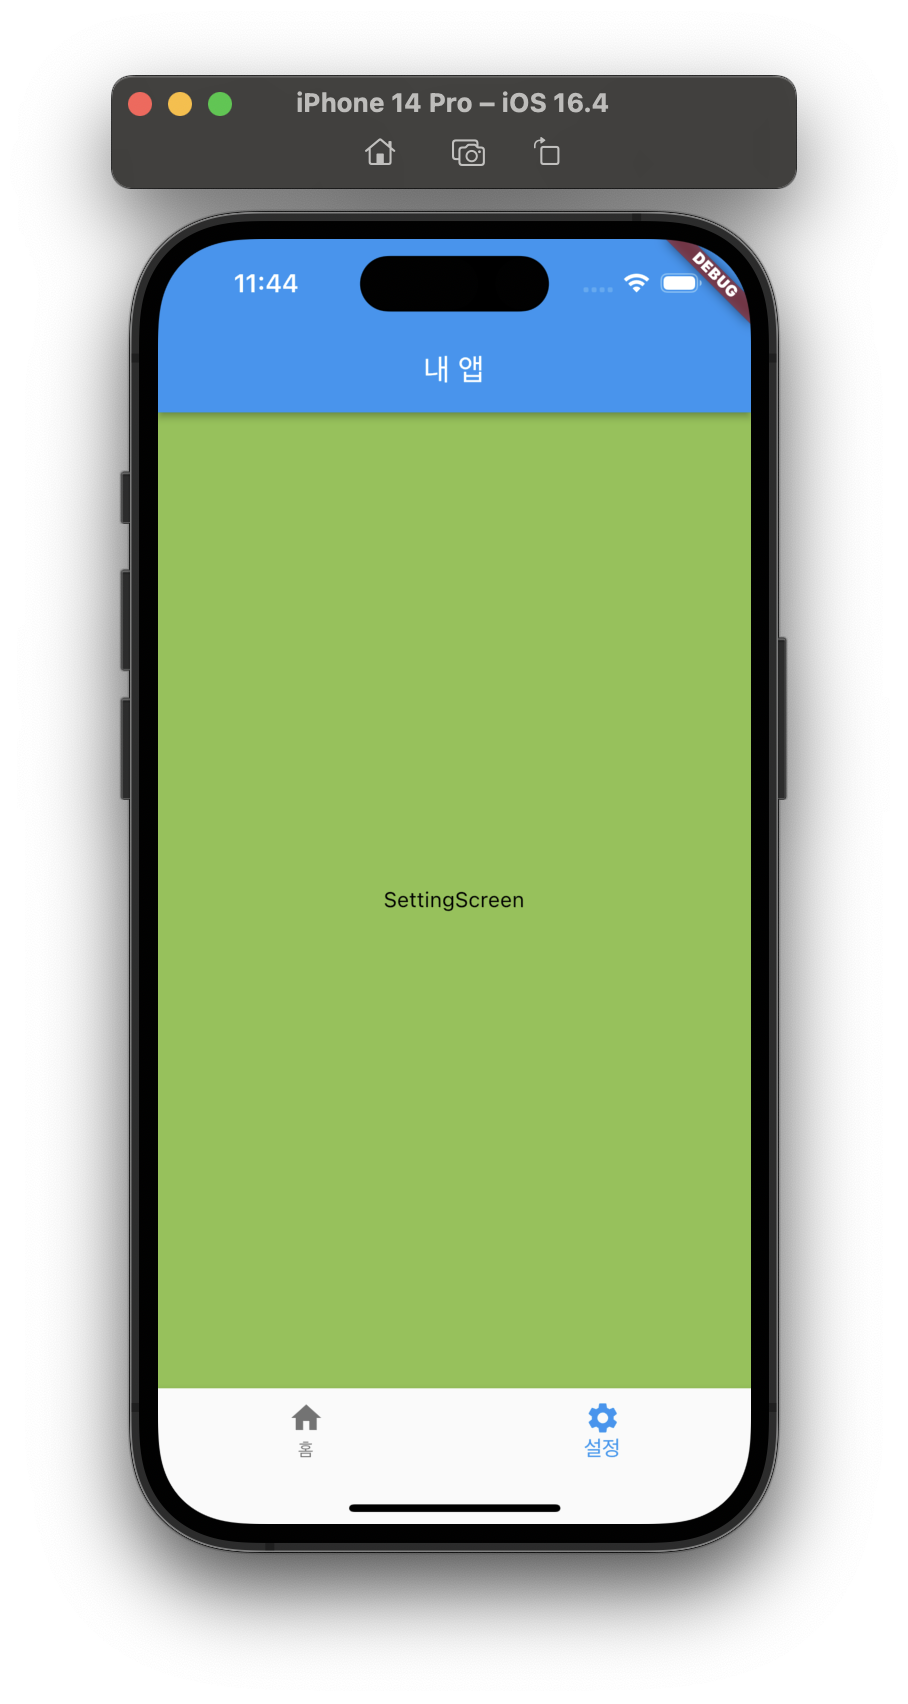
다음으로는 각 화면 위젯을 정의하는 HomeScreen과 SettingScreen 클래스를 살펴보겠습니다. 이들은 StatelessWidget을 상속하고 build 메서드를 구현한 위젯들입니다. HomeScreen과 SettingScreen은 각각 배경색과 텍스트를 가진 Scaffold 위젯을 반환합니다. 이 예제에서는 HomeScreen은 초록색 배경과 "HomeScreen" 텍스트를, SettingScreen은 밝은 초록색 배경과 "SettingScreen" 텍스트를 가지고 있습니다.
class HomeScreen extends StatelessWidget {
  @override
  Widget build(BuildContext context) {
    return const Scaffold(
        backgroundColor: Colors.greenAccent,
        body: Center(
          child: Text(
            'HomeScreen',
            style: TextStyle(
              color: Colors.black,
              fontSize: 14,
            ),
          ),
        ),
      );
  }
}
class SettingScreen extends StatelessWidget {
  @override
  Widget build(BuildContext context) {
    return const Scaffold(
      backgroundColor: Colors.lightGreen,
      body: Center(
        child: Text(
          'SettingScreen',
          style: TextStyle(
            color: Colors.black,
            fontSize: 14,
          ),
        ),
      ),
    );
  }
}
이제 위의 코드를 실행하면 앱 화면 상단에 "내 앱"이라는 타이틀이 표시되며, 초기 화면은 HomeScreen이 됩니다. 하단의 탭 메뉴를 클릭하면 _currentIndex 값이 변경되고, 해당 화면이 선택되어 표시됩니다.
이 예제를 통해 Flutter에서의 앱 내비게이션 구현 방법을 간단히 살펴보았습니다. BottomNavigationBar를 이용하면 사용자가 앱 내에서 원하는 화면으로 쉽게 이동할 수 있으며, 다양한 앱에서 내비게이션 구현에 활용할 수 있습니다.
실행화면
전체 코드입니다.
import 'package:flutter/material.dart';

void main() {
  runApp(MyApp());
}

class MyApp extends StatefulWidget {
  @override
  _MyApp createState() => _MyApp();
}

class _MyApp extends State<MyApp> {
  int _currentIndex = 0;
  final List<Widget> _screens = [
    HomeScreen(),
    SettingScreen(),
  ];

  @override
  Widget build(BuildContext context) {
    return MaterialApp(
      home: Scaffold(
        appBar: AppBar(
          title: Text('내 앱'),
        ),
        body: _screens[_currentIndex],
        bottomNavigationBar: BottomNavigationBar(
          currentIndex: _currentIndex,
          onTap: (index) {
            setState(() {
              _currentIndex = index;
            });
          },
          items: const [
            // 하단 탭 메뉴 아이템 1
            BottomNavigationBarItem(
              icon: Icon(Icons.home),
              label: '홈',
            ),
            // 하단 탭 메뉴 아이템 2
            BottomNavigationBarItem(
              icon: Icon(Icons.settings),
              label: '설정',
            ),
          ],
        ),
      ),
    );
  }
}

class HomeScreen extends StatelessWidget {
  @override
  Widget build(BuildContext context) {
    return const Scaffold(
        backgroundColor: Colors.greenAccent,
        body: Center(
          child: Text(
            'HomeScreen',
            style: TextStyle(
              color: Colors.black,
              fontSize: 14,
            ),
          ),
        ),
      );
  }
}
class SettingScreen extends StatelessWidget {
  @override
  Widget build(BuildContext context) {
    return const Scaffold(
      backgroundColor: Colors.lightGreen,
      body: Center(
        child: Text(
          'SettingScreen',
          style: TextStyle(
            color: Colors.black,
            fontSize: 14,
          ),
        ),
      ),
    );
  }
}